Common Glaze Defects
Even with careful formulation and application, fired glazes sometimes misbehave. Defects can be cosmetic or functional (especially on dinnerware), and sometimes the “defect” is an intentional effect. Here are common issues and ways to troubleshoot them.
1. Crazing
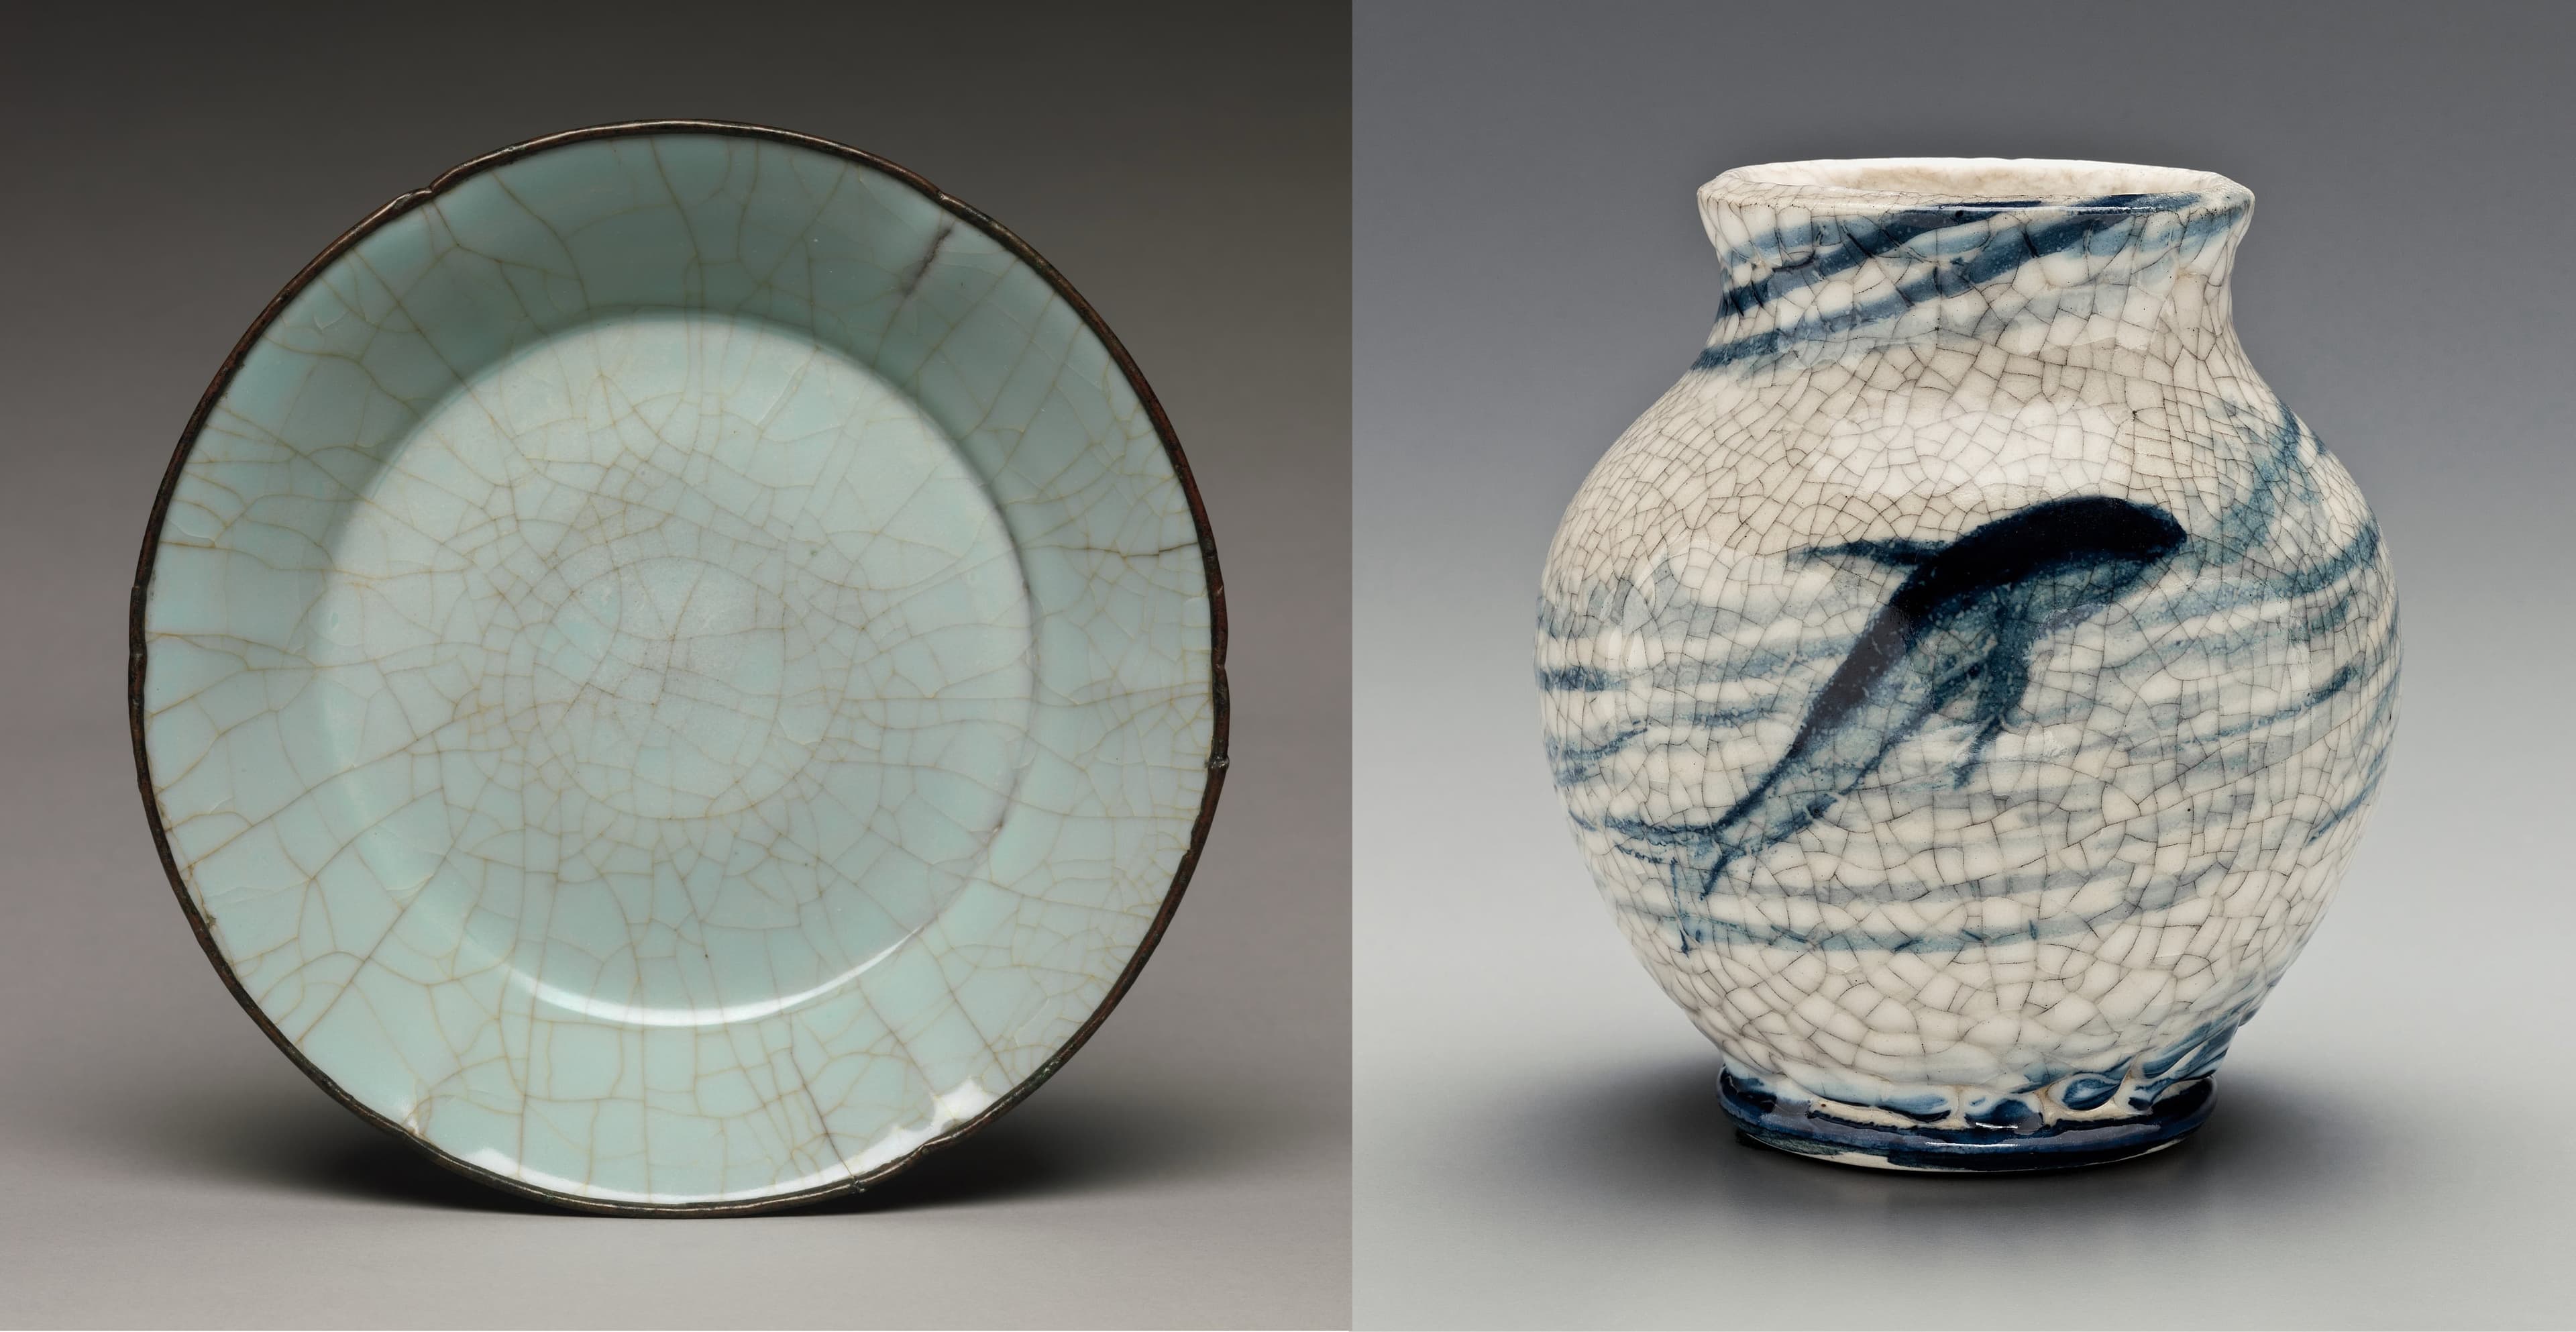
Crazing is a common glaze defect, but can also be used as a decorative effect in craquelé or “crackle” glazes. Left: Dish with crazed celadon glaze, China, late 12th–13th century Right: Vase with craquelé glaze, Hugh C. Robertson, ca. 1886–89
What It Looks Like A network of fine, spidery cracks that can appear immediately after firing or sometime later. These hairline fractures are usually more visible on a glossy surface.
Remember that crazing is a function of the expansion of both the glaze and clay body. Even popular recipes like Leach 4321 Clear can craze depending upon the clay body.
Key Cause
A thermal expansion mismatch between the glaze and clay body. When the glaze shrinks more than the clay as it cools, it splits to relieve the tension.
Why It Matters
Aside from the visual defect (which can be intentional in “crackle” glazes), crazing can weaken the ware. In functional pottery, it can harbor bacteria or allow liquid to seep in.
How to Fix or Prevent Crazing
- Lower the glaze’s expansion by adding more silica (SiO₂) or alumina (Al₂O₃). In practice, that might mean adding flint or increasing the clay content.
- Reduce high-expansion fluxes such as sodium and potassium (e.g., use less soda feldspar or potash feldspar, and consider substituting fluxes like calcium, zinc, or magnesium).
- Try a slower cool or a slightly higher firing temperature. A controlled cooling cycle can help alleviate crazing, although it doesn’t address the fundamental expansion mismatch, and delayed crazing may still appear.
- Apply a thinner glaze coat to reduce stress, though it doesn’t fix the expansion mismatch.
- Check the clay body. If adjusting the glaze itself isn’t practical, you might switch to a body with slightly higher silica or a modestly higher expansion to match your favorite glaze recipe.
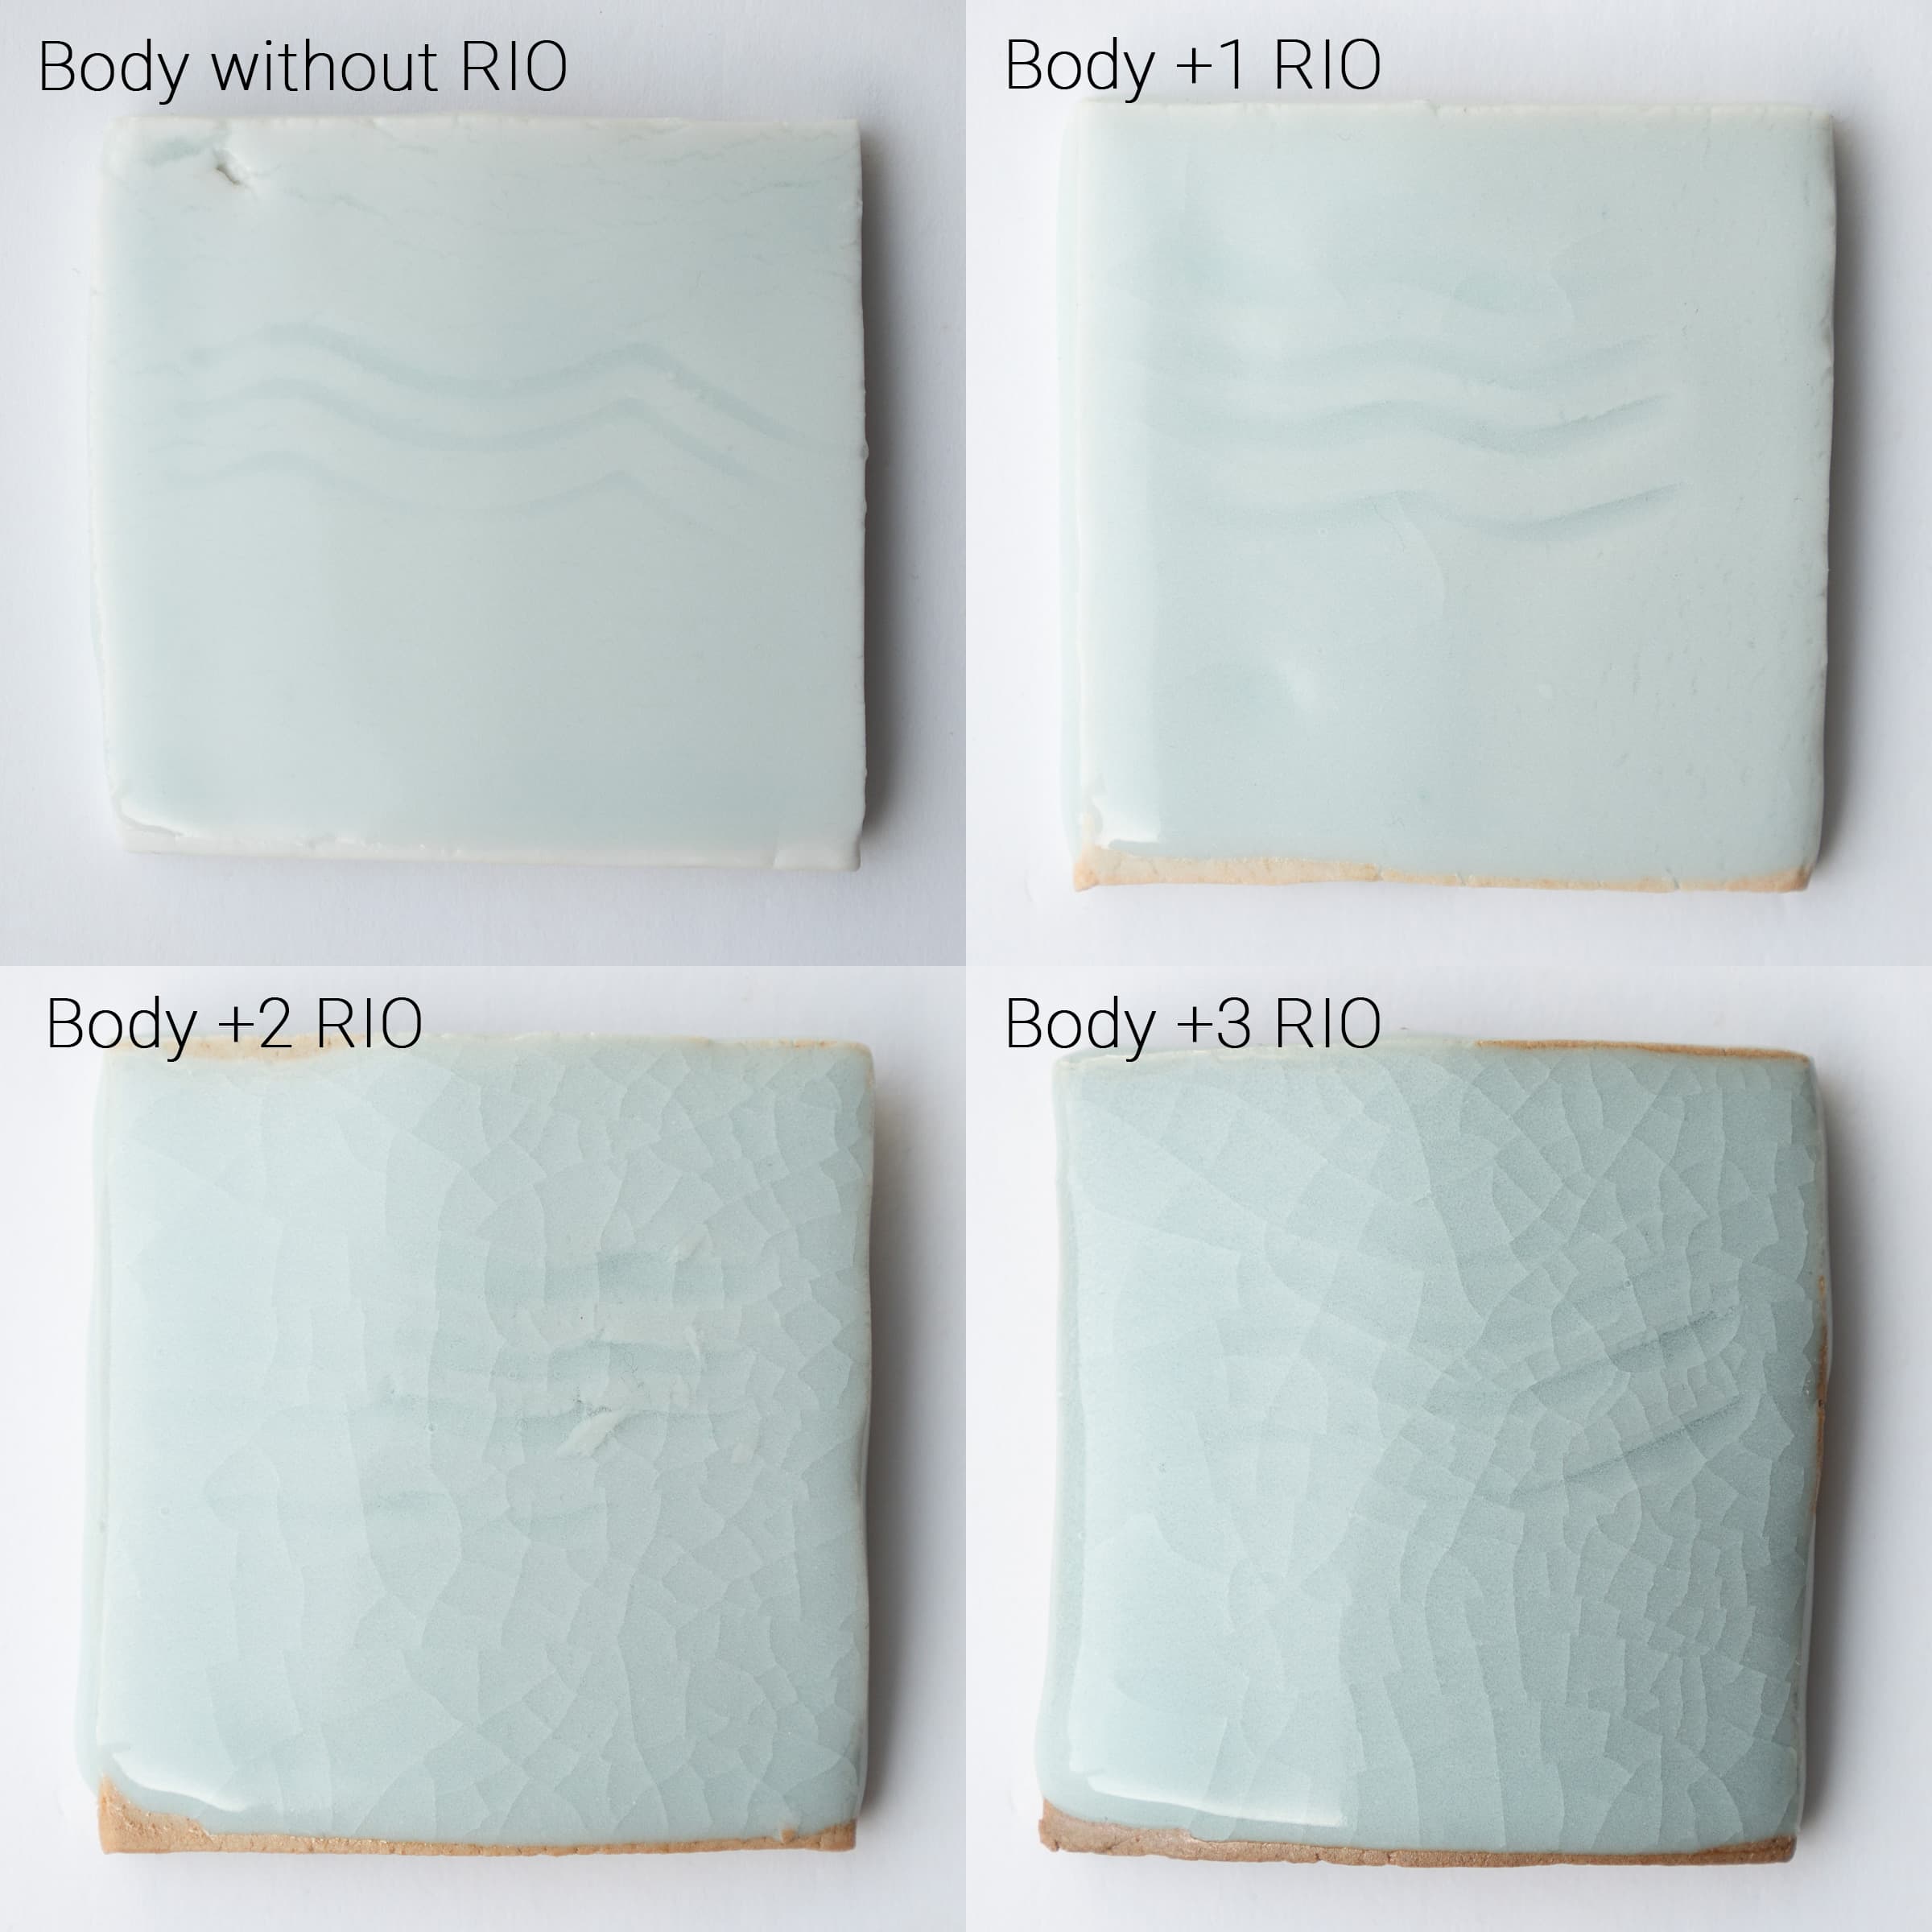
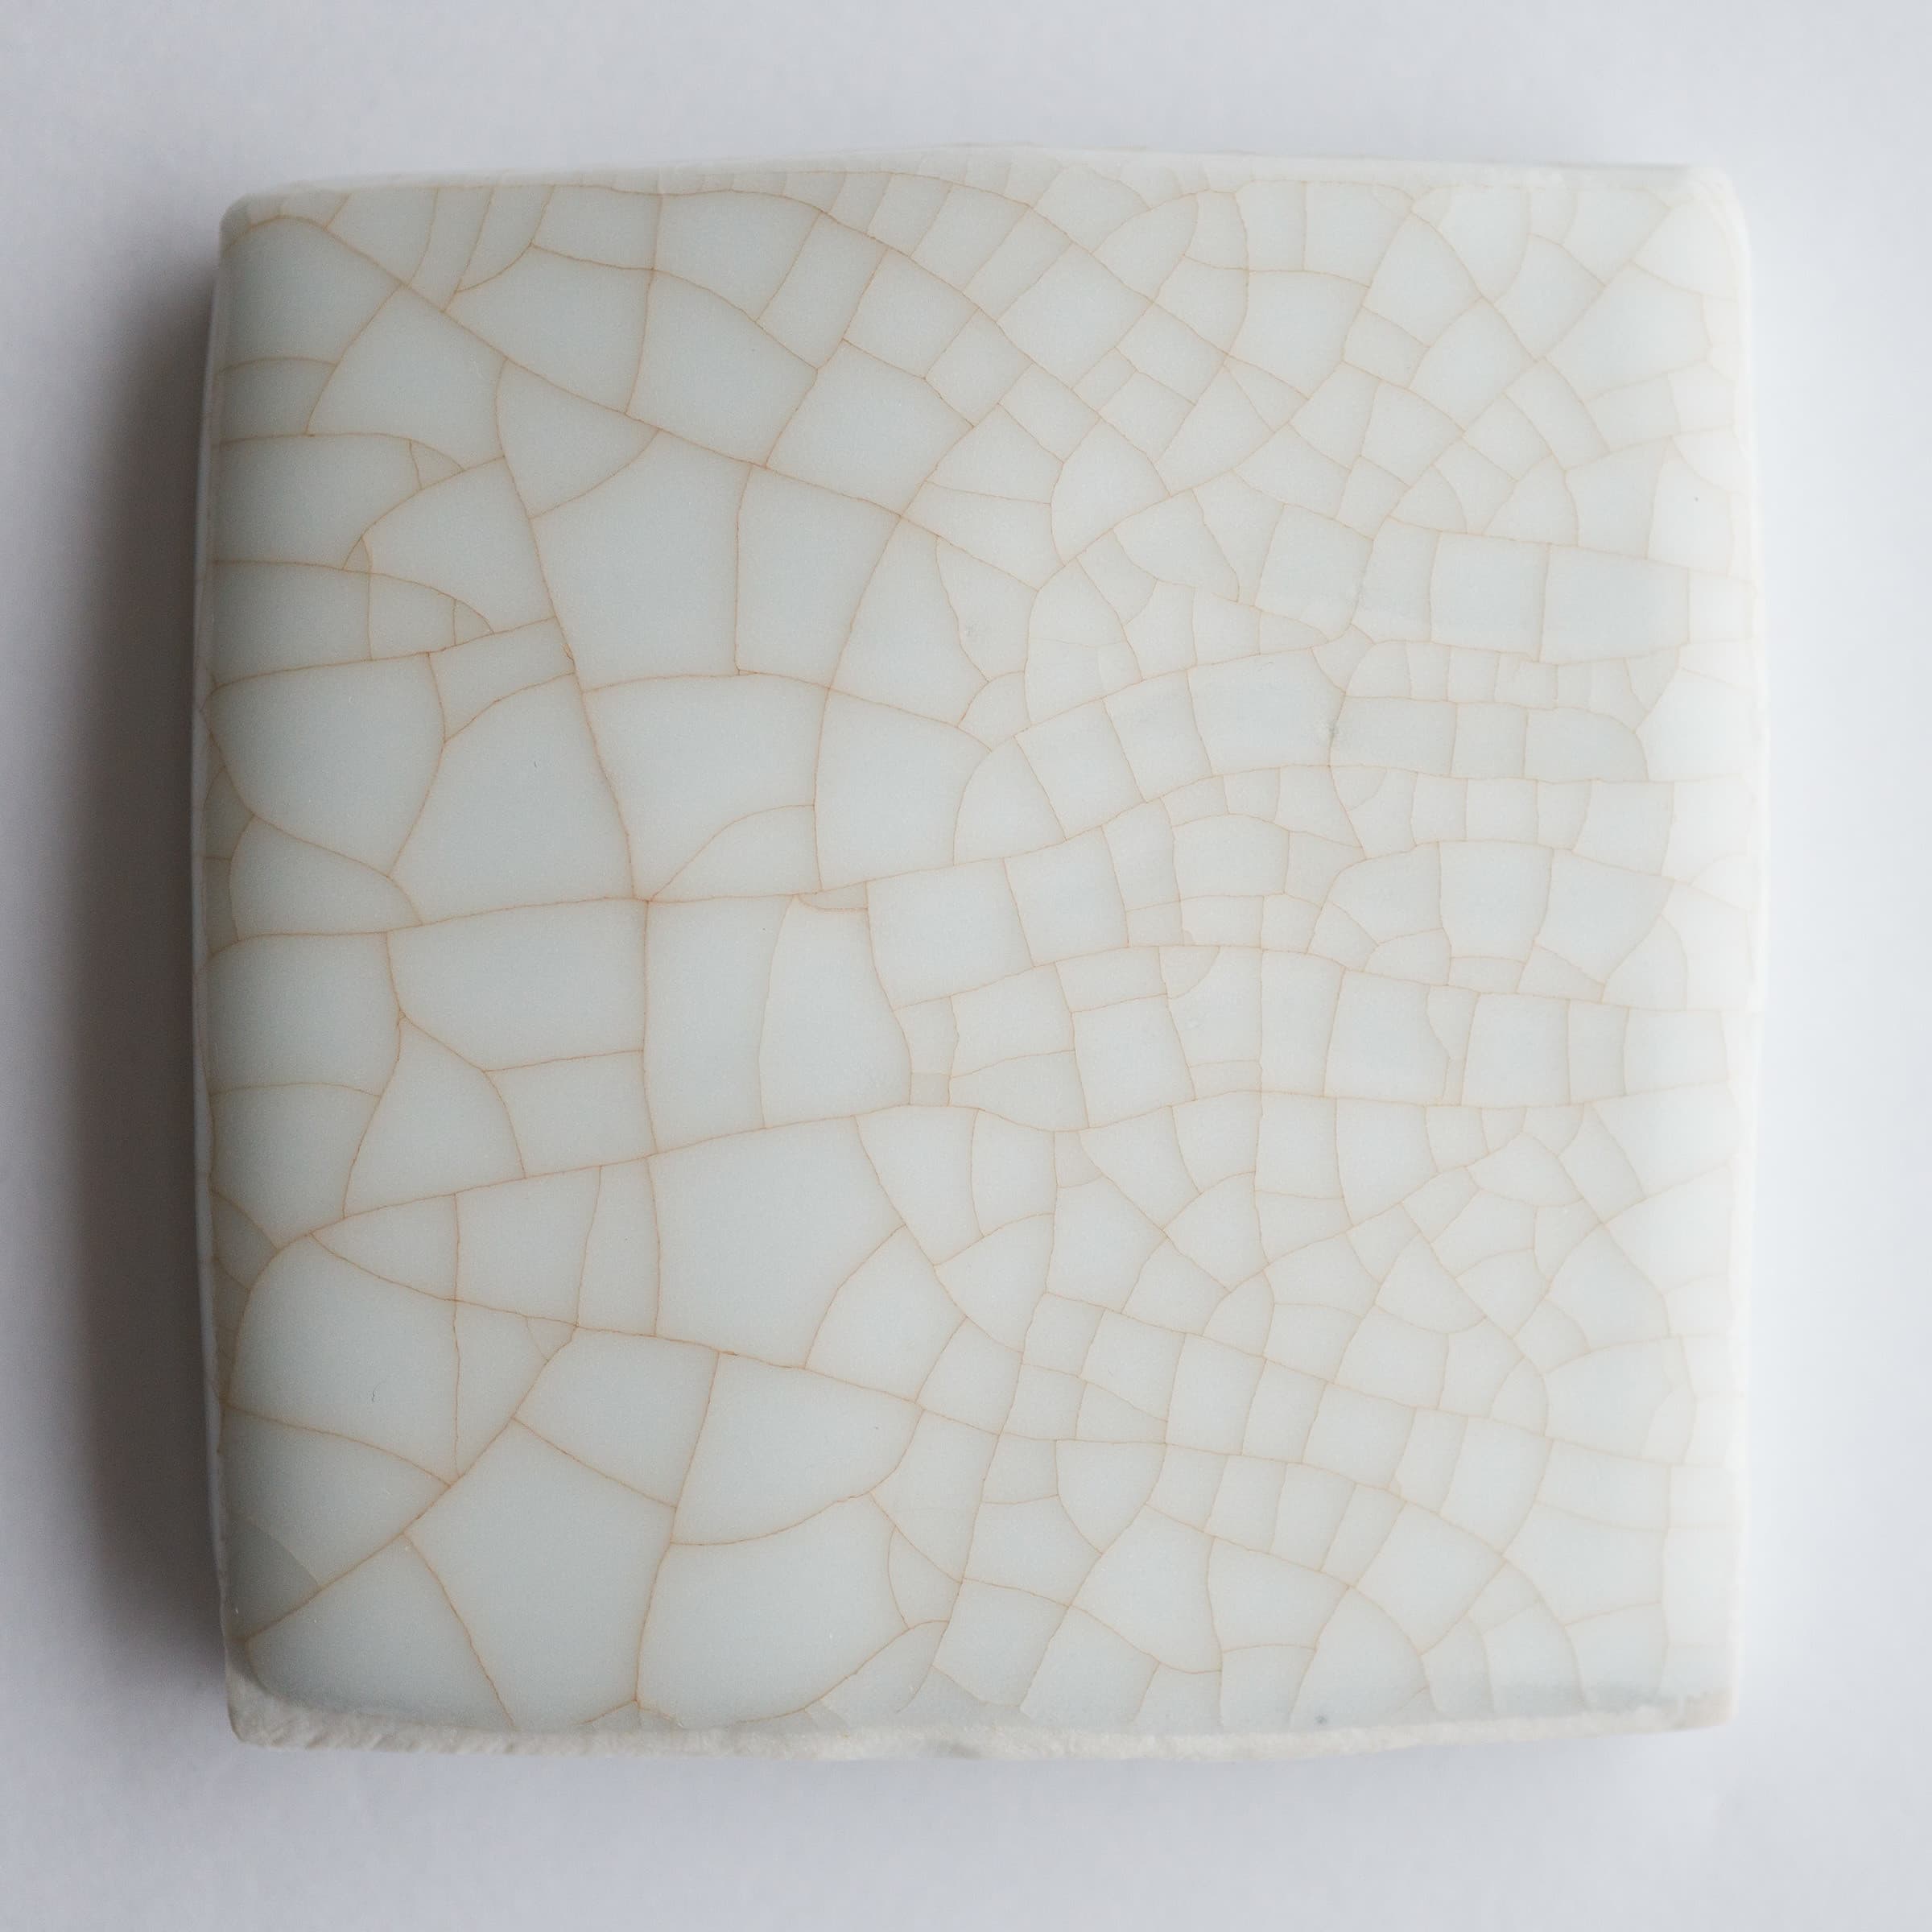
Here’s a test with a fixed glaze and variable body showing how the composition of the body can affect glaze fit. The glaze is Pinnell Blue Celadon (a fairly low-expansion glaze that does not usually craze on porcelain bodies), while the porcelain is a typical high-fire body with Red Iron Oxide (RIO) successively added in 1% increments. Fired in a reducing atmosphere to Orton cone 10. Without RIO, this glaze fits the body perfectly. After adding just 1% RIO to the body we can already see slight crazing, while at +2% RIO the glaze is completely crazed.
2. Shivering
What It Looks Like Thin flakes of glaze popping off the pot, often at rims or edges. Those sharp chips can peel away in sheets or tiny shards.
Key Cause
The glaze is in excessive compression. In other words, the glaze’s thermal expansion is too low compared to the clay’s. As the clay shrinks more during cooling, it “pushes” on the glaze until it shears off.
Why It Matters
It’s even more hazardous than crazing on functional ware; small shards of glaze can break off into food or drink.
How to Fix or Prevent Shivering
- Increase the glaze’s expansion by reducing silica or alumina, or by including higher-expansion fluxes (e.g., add more potash feldspar, soda feldspar, or a high-sodium frit).
- Use a clay body with lower expansion.
- Avoid glazing right to sharp edges of rims or foot rings, where stress is more likely to cause glaze flaking.
3. Crawling
What It Looks Like Areas where the glaze “beads up” or “rolls back,” leaving bare patches of clay. You’ll often see a pronounced ridge on the boundary of the crawled zone.
Key Cause
Poor adhesion of the glaze to the bisque before or during early melt. Often triggered by dust, grease, or an overly thick (and crack-prone) application. High surface tension in the molten glaze can also magnify this effect.
Why It Matters
Crawling leaves large, unglazed islands. On functional ware, that means exposed clay and possibly compromised usability. It’s also frustrating to see large bare patches on an otherwise fine piece.
How to Fix or Prevent Crawling
- Clean the bisque thoroughly. Any dust, oil from fingerprints, or handling residue makes the glaze separate.
- Avoid applying glaze too thickly. A heavy coat can crack as it dries, which turns into crawling once it melts.
- Lower raw clay content in the glaze or use some calcined clay instead of all raw kaolin/ball clay. Too much shrinkage in the dry coating leads to early cracking and crawling.
- Add a binder or gum (e.g., a bit of CMC, powdered gum, or a small amount of white glue) to help the glaze adhere more firmly.
- Adjust flux balance. Sometimes a matte glaze with high surface tension crawls; a small increase in flux or fluid frit can help it flow out.
4. Pinholes and Pitting
What It Looks Like Tiny holes in the glaze surface (about the size of a pinhead) that sometimes go down to the clay body. Pitting is similar but might appear as slightly larger, shallow craters.
Key Cause
Trapped gas bubbling up from the clay or the glaze itself (often organics burning out or carbonates decomposing) without enough time or fluidity for the surface to heal.
Why It Matters
Pinholes create a rough, unsanitary surface on tableware. They also spoil the reflective or smooth look you might want.
How to Fix or Prevent Pinholes/Pitting
- Lightly rub visible pinholes in the unfired glaze to fill them with the surrounding powder.
- A clean bisque firing that’s slow and well-ventilated so that carbon and other volatiles burn out thoroughly can help.
- Extend the firing (especially around the 650-900°C range) or add a soak at peak temperature. This gives time for gases to escape and the molten glaze to re-melt over holes.
- Fire slightly hotter if your glaze is underfired or too stiff, allowing it to flow and heal.
- Try a thinner application so the glaze layer doesn’t trap as many bubbles.
- Adjust outgassing materials. For instance, reduce zinc oxide or rutile if they cause excessive bubble formation, or switch to calcined versions.
- Improve body burnout by bisque-firing more slowly or at a higher temperature to reduce carbon or organic residues.
- A short oxidation soak at the end of a reduction firing can help heal the glaze surface.
5. Blistering
What It Looks Like Larger bubbles or “domes” in the glaze that either burst and leave craters or remain as blister-like bumps.
Key Cause
Similar to pinholes but typically more severe. Overfiring can also force the glaze to “re-boil,” creating visible bubbles.
Why It Matters
Blisters create a rough, pitted surface and can weaken the ware.
How to Fix or Prevent Blistering
- Apply the glaze in a thinner coat, especially if you’ve been double-dipping or pouring heavily.
- Ensure proper drying before firing. Residual water can generate steam pockets.
- Adjust firing temperature or cycle. Firing too hot or holding too long can exacerbate gas release, while not holding long enough can mean bubbles don’t heal.
- Check volatile fluxes (like borax, soda ash, or magnesium sulfate). Consider fritted forms of those fluxes to avoid gas bursts.
- Ventilate the kiln if possible. Stagnant atmospheres can trap volatile gases near the ware.